Quickstart Guide (Normcore)
Welcome to PlaySafe with Normcore integration!
What is Normcore?
Normcore is a real-time multiplayer networking framework for Unity that makes it easy to build multiplayer games and applications. It provides seamless voice chat, data synchronization, and networking capabilities that work across platforms including VR, mobile, desktop, and web.
This guide will walk you through installing and setting up the PlaySafe Unity SDK in a manner that works with Normcore for multiplayer voice chat and networking.
Prerequisites
Before we begin, make sure you have the following:
- Unity 2021.3 or a higher version installed.
- Normcore already integrated into your Unity project. If you haven't set up Normcore yet, visit the Normcore documentation first.
- A PlaySafe App Key. Need one? Reach out to the PlaySafe team at info@playsafe.ai or visit the PlaySafe Dashboard if you already have an account.
Installation & Setup
Follow these steps to integrate the PlaySafe SDK into your Unity project with Normcore.
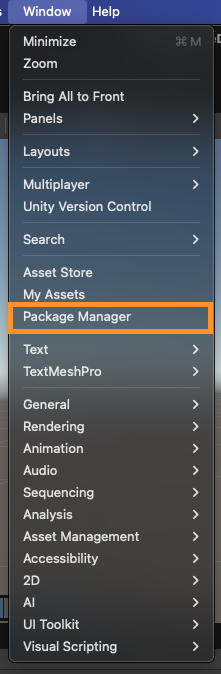
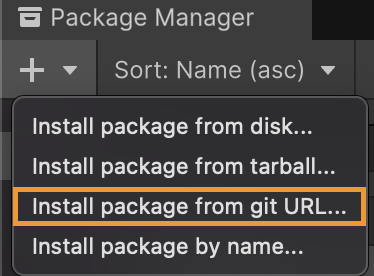
Step 1: Import the SDK via Package Manager
The easiest way to install the SDK is directly from its Git repository using the Unity Package Manager.
-
In your Unity Editor, go to Window > Package Manager.
-
Click the '+' (plus) icon in the top-left corner of the Package Manager window.
-
Select "Add package from git URL..." from the dropdown menu.
-
Enter the following Git URL into the text field:
https://github.com/dogelabsvr/PlaySafe-UnitySDK.git -
Click Add. Unity will now download and import the SDK package into your project.
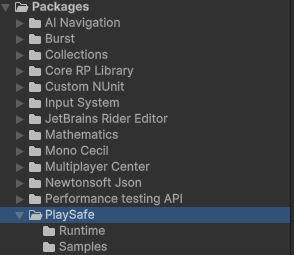
You should see the PlaySafe SDK listed under your project's Packages folder once the import is complete.
Step 2: Set up the PlaySafe Manager
The SDK requires a dedicated GameObject in your scene to manage its operations, particularly for Normcore voice integration.
-
In your Hierarchy window, create a new empty GameObject. Right-click in the Hierarchy panel and select Create Empty.
-
Rename this new GameObject to
PlaySafeManager.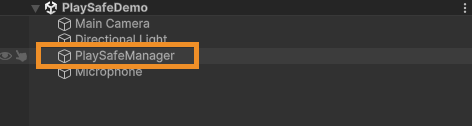
-
With the
PlaySafeManagerempty GameObject selected, go to the Inspector window. -
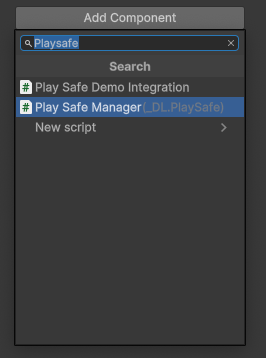
Click Add Component.
-
Search for
PlaySafeManagerand select the script to add it as a component.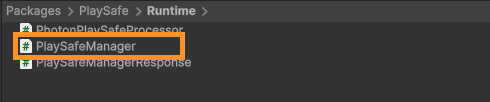
Step 3: Configure the PlaySafe Manager
Now, let's configure the PlaySafeManager component with your App Key.
-
Select the
PlaySafeManagerGameObject in your Hierarchy. -
In the Inspector, you'll see the
PlaySafeManagercomponent with several fields. The most important one is theApp Key.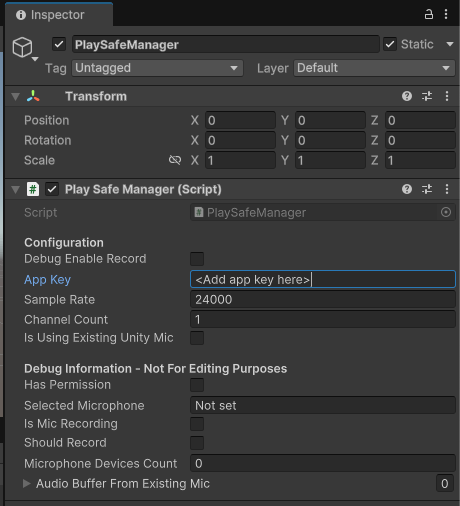
-
You'll need to paste your unique PlaySafe App Key into this field. If you don't have one yet, follow the next step!
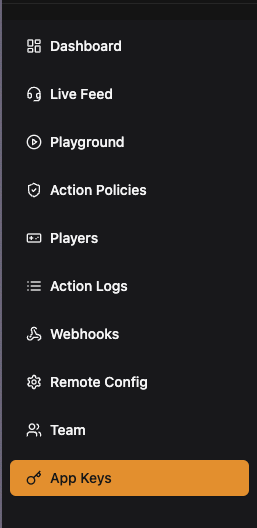
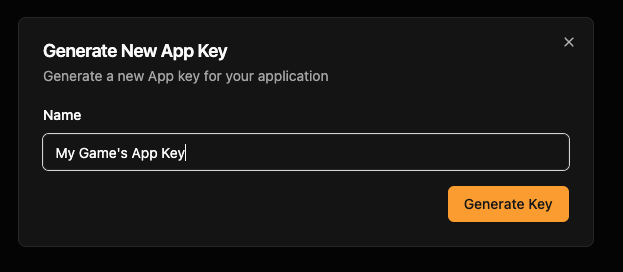
Step 4: Generate Your App Key (If Needed)
If you haven't generated an App Key yet, here's how to do it from the PlaySafe Dashboard:
-
Log in to your PlaySafe Dashboard.
-
Navigate to the App Keys section using the sidebar menu.
-
Click the Generate App Key button.

-
A dialog box will appear that allows you to create your new app key. Once generated, click the Copy button to copy it to your clipboard. Make sure to store this key securely, as it won't be shown again.
-
Go back to the Unity Editor, select your
PlaySafeManagerGameObject, and paste the copied key into theApp Keyfield in the Inspector.
Normcore Specific Integration
Adding PlaySafe with Normcore integration takes less than 5 minutes. This integration example is using the XR Avatars and Voice Chat setup from Normcore but you can adapt it to your own Normcore setup.
-
In
Packages/PlaySafe/Samplesdirectory, move thePlaySafeNormcoreDemoIntegration.csscript intoAssets/PlaySafe/directory. Create an emptyPlaySafe/directory in theAssetsfolder if it doesn't already exist. Uncomment the code in the script to enable the integration.Note: If you try opening this script while it is in the
Packages/Samplesdirectory, you will get an error that says thatRealtimeAvatarManagercould not be found. This will disappear once the script is in your assets folder -
Click on your
PlaySafeManager, open the inspector and add aPlaySafe Normcore Demo Integrationscript. Once added, link each component into the various fields available:
-
PlaySafe Managercan be plugged into thePlaySafe Managerslot -
RealtimeandRealtimeAvatarManagercan both be derived from the prefab/component that contains your NormcoreRealtimeAvatarManagerin the scene.
- That's it! If you play your game in the editor, you should now see a
"PlaySafeManager is running!"message.
![]()
You will also notice a NotImplementedException being thrown. To make this disappear, you will need to add your own implementation for checking if a microphone is muted or not in the PlaySafeNormcoreDemoIntegration.cs script.
Understanding the Integration
PlaySafe integrates seamlessly with Normcore's voice chat system through the PlaySafeNormcoreDemoIntegration. This script acts as an audio processor that intercepts voice data from Normcore's microphone input and forwards it to PlaySafe for real-time toxicity detection. The script has already been setup with Normcore specific defaults to get you up to speed as fast as possible.
Normcore-Specific Configuration
When using PlaySafe with Normcore, you'll need to implement specific logic for multiplayer scenarios:
1. Room-Based Recording Logic
CanRecord() determines whether or not an audio can be recorded and should consider your Normcore room state. We have provided sensible defaults for getting started with this.
private bool CanRecord()
{
    return IsVoiceMuted() && // Only record the player's mic if it is not muted
            IsConnectedToRoom() && // Only record if they are in a room
            GetRoomPlayerCount() >= 2; // Only record if there are other players in the room
    // Alternatively, you can simply return true when testing in the editor
}

private bool IsVoiceMuted()
{
    // Since every game handles voice differently, you will need to implement this using your own game logic
    // TODO: Implement your own logic to determine if a player's mic is muted
    throw new NotImplementedException();
}

private bool IsConnectedToRoom()
{
    return realtime.connected;
}

public int GetRoomPlayerCount()
{
    if (IsConnectedToRoom())
    {
        return _realtimeAvatarManager.avatars.Count;
    }

    return 0;
}
2. Room-Based Telemetry
Your GetTelemetry() method should provide Normcore room information:
// Used to identify a player when an event is sent to PlaySafe - e.g. an audio event
private PlaySafeManager.AudioEventRequestData GetTelemetry()
{
    string userId = "1234"; // TODO: Get user account id / platform user id
    string userName = "ExampleUser"; // TODO: Get public player username
    string language = Application.systemLanguage.ToString();
    string roomId = "";

    if (IsConnectedToRoom())
    {
        roomId = realtime.room.name;
    }

    Debug.Log("PlaySafeNormcoreDemoIntegration roomId:" + roomId);

    PlaySafeManager.AudioEventRequestData telemetry = new PlaySafeManager.AudioEventRequestData()
    {
        UserId = userId,
        UserName = userName, // Optional but encouraged for dashboard search
        RoomId = roomId,
        Language = language,
    };

    return telemetry;
}
3. Handle Moderation Actions in Multiplayer Context
Your OnPolicyViolationEvent() method is triggered whenever a player is actioned by PlaySafe (ie. when they violate your action policy). You should handle voice chat restrictions appropriately in a multiplayer environment:
 private void OnPolicyViolationEvent(ActionItem actionEvent, DateTime serverTime)
{
    string duration = actionEvent.DurationInMinutes >= 60 ?
        $"{(actionEvent.DurationInMinutes / 60f).ToString("F1")} hours" :
        $"{actionEvent.DurationInMinutes} minutes";

    DateTime bannedUntil = serverTime + System.TimeSpan.FromMinutes(actionEvent.DurationInMinutes);
    string msgToUser = $"Voice chat disabled for {duration}. This can happen due to using slurs, fighting, or general disrespectful behavior";
    // TODO: Notify the user they were banned

    // TODO: Turn off their microphone until the bannedUntil date passes
}
For detailed API documentation, see the API Reference section.
In case of anything, feel free to reach out to us at info@playsafe.ai or via Discord.