Moderation
PlaySafe Moderation provides a suite of tools designed to help you create a safer and more positive environment in your Unity games by addressing in-game toxicity. These tools allow you to automatically analyze voice chat for harmful behavior, enforce moderation policies, and enable players to report or mute others.
This guide explains how to integrate and use the core moderation features of the PlaySafe SDK.
Core Concepts & Setup
Before using moderation features, ensure you have followed the Quickstart Guide to install the SDK and set up the PlaySafeManager component in your scene.
The PlaySafeManager relies on several delegates (callbacks) that you must implement in your own script and assign before calling PlaySafeManager.Instance.Initialize(). These delegates connect the SDK to your game's specific logic.
Here's a typical setup pattern, often placed in a script attached to the same GameObject as the PlaySafeManager or another central manager script:
using System;
using _DL.PlaySafe;
using UnityEngine;

public class MyGameModeration : MonoBehaviour
{
    [SerializeField] PlaySafeManager playSafeManager; // Assign in Inspector

    void Start()
    {
        // --- Assign Delegates BEFORE Initializing ---
        playSafeManager.CanRecord = ShouldRecordAudio;
        playSafeManager.GetTelemetry = ProvideTelemetryData;

        // **Note:** `OnPolicyViolationEvent()` was previously called `OnActionEvent()` in earlier versions of the SDK
        playSafeManager.OnPolicyViolationEvent = HandleModerationAction;
        // ------------------------------------------

        // Initialize PlaySafeManager
        playSafeManager.Initialize();
    }

    // --- Delegate Implementations (Examples Below) ---

    private bool ShouldRecordAudio()
    {
        // Your logic here...
        return true; // Placeholder
    }

    private PlaySafeManager.AudioEventRequestData ProvideTelemetryData()
    {
        // Your logic here...
        return new PlaySafeManager.AudioEventRequestData { /* ... */ }; // Placeholder
    }

    private void HandleModerationAction(ActionItem action, DateTime serverTime)
    {
        // Your logic here...
    }
}
Let's look at each delegate:
1. CanRecord Delegate
This delegate (Func<bool>) tells the PlaySafeManager whether it's currently appropriate to record the local player's microphone audio for analysis. You should return true only when conditions for recording are met according to your game's logic and privacy considerations.
Example Implementation:
private bool ShouldRecordAudio()
{
    // Your game's logic determines when to record. Examples:
    bool isPlayerMutedLocally = MyGameManager.Instance.IsPlayerMuted; // e.g., user setting
    bool isInMultiplayerScene = MyGameManager.Instance.CurrentScene == "MultiplayerLobby";
    int otherPlayersInRoom = MyGameManager.Instance.GetPlayerCount() - 1;

    // Only record if the player is not muted, is in a multiplayer area,
    // and there's at least one other player present.
    return !isPlayerMutedLocally && isInMultiplayerScene && otherPlayersInRoom > 0;
}
2. GetTelemetry Delegate
This delegate (Func<AudioEventRequestData>) provides essential context whenever audio is sent for analysis or a report is made. The AudioEventRequestData object requires:
UserId: A unique, persistent identifier for the local player.RoomId: An identifier for the current game session, room, or server the player is in.Language: (Optional) The player's language code (e.g., "en", "es") if known. Helps improve analysis accuracy.
Example Implementation:
private PlaySafeManager.AudioEventRequestData ProvideTelemetryData()
{
    string currentUserId = MyGameManager.Instance.LocalPlayerUserId; // Get from your player management system
    string currentRoomId = MyGameManager.Instance.CurrentRoomName; // Get from your room/session system
    string playerLanguage = Application.systemLanguage.ToString(); // Example: Use system language

    return new PlaySafeManager.AudioEventRequestData()
    {
        UserId = currentUserId,
        RoomId = currentRoomId,
        Language = playerLanguage,
    };
}
3. OnPolicyViolationEvent Delegate
Note:
OnPolicyViolationEvent()was previously calledOnActionEvent()in earlier versions (before 0.10.0) of the SDK
This delegate (Action<ActionItem, DateTime>) is called when the PlaySafe backend completes an audio analysis and recommends a moderation action (like a timeout or mute) based on detected violations.
ActionItem: Contains details about the recommended action:Action(string): The type of action (e.g., "TIMEOUT", "MUTE").ViolationType(string): The reason for the action (e.g., "mildly_explicit_language").DurationInMinutes(int): The recommended duration for the action in minutes.
serverTime(DateTime): The server's timestamp (UTC) when the analysis was completed. This is crucial for accurately calculating when a temporary action (like a timeout) should expire.
Example Implementation:
private void HandleModerationAction(ActionItem action, DateTime serverTime)
{
    Debug.Log($"[PlaySafe Action] Received: {action.Action}, Reason: {action.Reason}, Duration: {action.DurationInMinutes} mins. Server Time: {serverTime}");

    if (action.Action == "TIMEOUT")
    {
        // Calculate when the timeout expires using the server's time
        DateTime timeoutExpiresUtc = serverTime + TimeSpan.FromMinutes(action.DurationInMinutes);

        // Store the expiration time and disable voice chat for the player
        MyGameManager.Instance.SetVoiceChatTimeout(timeoutExpiresUtc);

        // Inform the player
        string durationText = action.DurationInMinutes >= 60 ?
            $"{(action.DurationInMinutes / 60f):F1} hours" :
            $"{action.DurationInMinutes} minutes";
        UIManager.Instance.ShowNotification($"Voice chat disabled for {durationText} due to: {action.Reason}");

        Debug.Log($"[PlaySafe Action] Player voice timed out until: {timeoutExpiresUtc} UTC");
    }
    else if (action.Action == "MUTE")
    {
       // Potentially apply a persistent mute based on game rules
       MyGameManager.Instance.ApplyPersistentMute();
       UIManager.Instance.ShowNotification($"You have been muted due to: {action.Reason}");
    }
    // Handle other potential actions as needed
}
Audio Processing & Analysis
Once initialized with the required delegates, PlaySafeManager automatically handles the audio recording lifecycle:
- Checks
CanRecord(): Periodically checks if yourCanRecorddelegate returnstrue. - Starts Recording: If
CanRecord()is true and the configured intermission (_recordingIntermissionSeconds, default 60s, derived from the Remote Config sampling rate) has passed since the last recording stopped, it starts recording the microphone for a fixed duration (RecordingDurationSeconds, default 10s). IfalwaysModerateis enabled, the intermission is skipped - see Always Moderate. - Stops Recording: After
RecordingDurationSeconds, it stops recording. - Processes Audio: Performs a basic silence check (
_silenceThreshold, default0.001, overridable from Remote Config) – silent clips are discarded to save bandwidth and processing. Non-silent audio is encoded with Opus at 16 kHz on a background thread, so encoding doesn't stall the main thread. - Sends for Analysis: It calls your
GetTelemetry()delegate to get context (UserID, RoomID) and sends the Opus audio and telemetry to the PlaySafe/products/moderation/opusendpoint for analysis. - Handles Response: When the analysis is complete, the response is processed. If moderation actions are recommended, your
OnPolicyViolationEventdelegate is invoked.
Always Moderate
Available from 0.16.7.
By default, how often audio is recorded follows the sampling rate set in Remote Config. For players or game modes that should be moderated 100% of the time (for example, a player already under review, or a competitive lobby), set alwaysModerate to true. Every recording opportunity is then taken, ignoring the sampling rate.
// Moderate every chance while this player is in a ranked match
playSafeManager.alwaysModerate = isRankedMatch;
- It is also exposed in the Inspector as Always Moderate, which is handy for testing in the editor.
- It is read on every tick, so changing it from game logic takes effect immediately without re-initializing.
- Your
CanRecorddelegate still applies -alwaysModerateoverrides sampling, not mute, consent or lobby state. - It only controls whether a new recording starts. Setting it to
falsewon't cut off a recording already in progress. - It is client-side only and is never sent to PlaySafe.
Using Existing Audio Streams (e.g., Photon Voice)
If your game already captures microphone audio using another system like Photon Voice, you can configure PlaySafeManager to use that audio stream instead of directly accessing the microphone.
- Enable Flag: Set the
isUsingExistingUnityMicfield totrueon thePlaySafeManagercomponent in the Inspector.
Reporting, Muting and Blocking Players
Typed wrappers and blocking available from 0.18.0. The optional reason argument is available from 0.19.2.
Beyond automatic voice analysis, players can report, mute or block each other. Each action has a pair of async methods on PlaySafeManager: one to apply it and one to undo it.
| Action | Apply | Undo |
|---|---|---|
| Report | ReportPlayerAsync(targetUserId, reason) | UndoReportPlayerAsync(targetUserId, reason) |
| Mute | MutePlayerAsync(targetUserId, reason) | UnmutePlayerAsync(targetUserId, reason) |
| Block | BlockPlayerAsync(targetUserId, reason) | UnblockPlayerAsync(targetUserId, reason) |
- The acting player is the local player, taken from your
GetTelemetrydelegate. You only pass the target's user ID. - Apply methods return a
ModerationEventResponse; undo methods return aPlaySafeApiResponse. Both returnnullif the request fails. - These calls only record the action with PlaySafe. Muting audio or hiding a blocked player's chat is still up to your game.
- Reports, mutes and blocks by other players all count towards a player's respect score and show up in their stats on the PlaySafe Dashboard.
reason is optional free text describing why the action was taken. Leave it out and it is not sent.
Example: Report Button
using _DL.PlaySafe;
using UnityEngine;

public class PlayerInteractionManager : MonoBehaviour
{
    public async void ReportPlayerButtonClicked(string targetPlayerId)
    {
        if (string.IsNullOrEmpty(targetPlayerId))
        {
            Debug.LogError("Cannot report player: Missing user ID.");
            return;
        }

        var result = await PlaySafeManager.Instance.ReportPlayerAsync(targetPlayerId);

        if (result != null && result.Ok)
        {
            UIManager.Instance.ShowNotification("Thanks, your report was sent.");
        }
        else
        {
            UIManager.Instance.ShowNotification("Could not send your report. Please try again.");
        }
    }
}
Example: Mute and Block Toggles
using _DL.PlaySafe;
using UnityEngine;

public class PlayerInteractionManager : MonoBehaviour
{
    public async void MuteToggled(string targetPlayerId, bool isNowMuted)
    {
        // Apply the change in your game's audio system
        MyGameAudioManager.Instance.SetPlayerMuteState(targetPlayerId, isNowMuted);

        // Log it with PlaySafe
        if (isNowMuted)
            await PlaySafeManager.Instance.MutePlayerAsync(targetPlayerId);
        else
            await PlaySafeManager.Instance.UnmutePlayerAsync(targetPlayerId);
    }

    public async void BlockToggled(string targetPlayerId, bool isNowBlocked)
    {
        MyGameSocialManager.Instance.SetPlayerBlocked(targetPlayerId, isNowBlocked);

        if (isNowBlocked)
            await PlaySafeManager.Instance.BlockPlayerAsync(targetPlayerId);
        else
            await PlaySafeManager.Instance.UnblockPlayerAsync(targetPlayerId);
    }
}
See the API reference for ReportPlayerAsync, MutePlayerAsync and BlockPlayerAsync.
Appealing Bans
Players can appeal their bans by submitting a ban appeal through the PlaySafe system via your game/client. This allows players to contest moderation decisions and provide additional context about their situation.
How to Appeal a Ban
You will need to add custom UI in your game to facilitate this.
The AppealBanAsync method allows players to submit a ban appeal programmatically:
Function Signature:
public async Task<BanAppealResponse?> AppealBanAsync(string appealReason = null)
appealReason: Optional string explaining why the player believes the ban should be lifted
Usage Example:
using _DL.PlaySafe;
using UnityEngine;

//? This is simply an example of how you could implement ths
public class PlaySafeDemoIntegration : MonoBehaviour
{
    //... rest of your PlaySafe integration
    public async void OnAppealButtonClicked()
    {
        string appealMessage = "I believe this ban was issued in error. I was not using inappropriate language.";

        try
        {
            // or PlaySafeManager.Instance.AppealBanAsync
            var result = await playSafeManager.AppealBanAsync(appealMessage);

            if (result != null && result.Ok)
            {
                Debug.Log("Ban appeal submitted successfully!");
                UIManager.Instance.ShowNotification("Your appeal has been submitted and will be reviewed.");
            }
            else
            {
                Debug.LogWarning($"Ban appeal failed: {result?.Message ?? "Unknown error"}");
                UIManager.Instance.ShowNotification("Failed to submit appeal. Please try again later.");
            }
        }
        catch (System.Exception ex)
        {
            Debug.LogError($"Error submitting ban appeal: {ex.Message}");
            UIManager.Instance.ShowNotification("An error occurred while submitting your appeal.");
        }
    }

    public async void OnQuickAppealButtonClicked()
    {
        // Submit appeal without custom reason
        try
        {
            // or PlaySafeManager.Instance.AppealBanAsync
            var result = await playSafeManager.AppealBanAsync();

            if (result != null && result.Ok)
            {
                Debug.Log("Quick ban appeal submitted successfully!");
                UIManager.Instance.ShowNotification("Your appeal has been submitted for review.");
            }
        }
        catch (System.Exception ex)
        {
            Debug.LogError($"Error submitting quick appeal: {ex.Message}");
        }
    }
}
Important Notes
-
Username Required: The ban appeal system requires a valid
UserNamein yourGetTelemetry()delegate. Ensure this is properly configured before callingAppealBanAsync(). -
One Active Appeal: Players can only have one active appeal at a time. Attempting to submit multiple appeals will be rejected.
-
Appeal Process: Once submitted, appeals are reviewed by moderators through the PlaySafe dashboard. Players will be notified of the decision through your game's webhook system (if configured).
-
Error Handling: Always wrap the
AppealBanAsynccall in try-catch blocks as it may throw exceptions if the username is missing or network issues occur.
Unbanning / Forgiving Players
In some scenarios, you may want to unban players that have been either automatically banned by PlaySafe or by a moderator. In such cases, you would "forgive" those players.
Understanding how forgiveness works
- Forgiving a player clears their active action log
- This means that if a player was banned for 24 hours and they are still banned, once you forgive them, PlaySafe will:
- Delete their punishment
- Send a webhook request to your configured webhook URLs with the
forgiveaction - Create a new
forgiveaction log
- To ensure that a player is unbanned in your game, you MUST handle the unbanning on your backend.
Where you can forgive a player from in PlaySafe
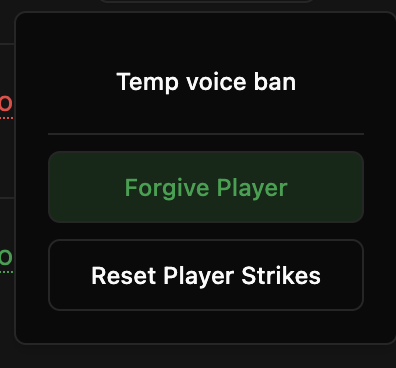
Here's what you can do with the forgive feature. In any audio events table, click on "Take Action"

- You can forgive a player via the live feed, playground or player profile dialog.
- You have the option to either keep the strikes that a player has or reset them
Handling forgiveness on your backend
In the webhook URL endpoint you have specified, you will receive a POST request that has a body that looks something like this.
{
  "endDate": "2025-07-10T06:43:53.573Z",
  "trigger": "manual_forgiveness",
  "audioUrl": "",
  "isActive": false,
  "productId": "eb70b6f8-5a25-49c7-9be2-a15cd8fa1d19",
  "transcript": "",
  "actionValue": "forgive",
  "description": "Player was manually forgiven by a moderator",
  "playerUserId": "playground-player-user-id",
  "delayInSeconds": 0,
  "triggersStrike": false,
  "durationInMinutes": 0,
  "actionFriendlyName": "Forgive Player"
}
You can also view the request body sent in your PlaySafe dashboard webhooks section.
If the actionValue is forgive, then you can proceed to unban the player using your game's unban business logic.
Marking Players as Devs
A player counts as a dev when their in-game player user ID is mapped to a team member in your PlaySafe dashboard.
-
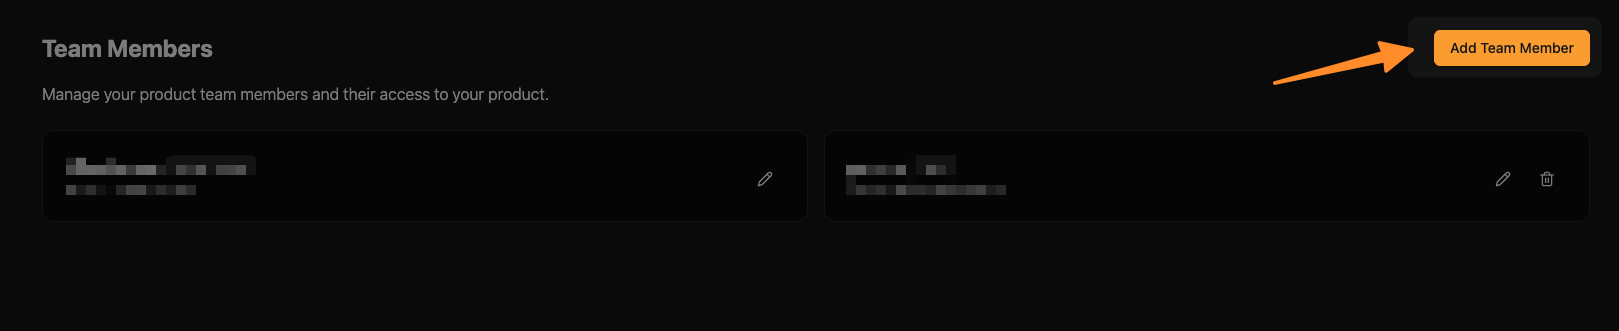
Navigate to your PlaySafe Team Members page and click on the "Add Team Member" button.
-
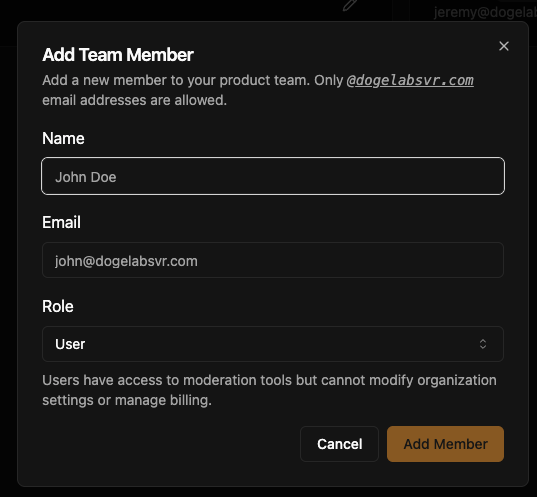
Fill in the team member's details in the form that appears:
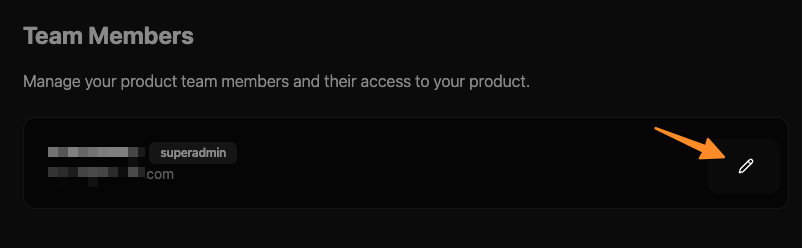
You can also edit existing team members by clicking on the edit icon:
-
Map each team member to their in-game player user ID:
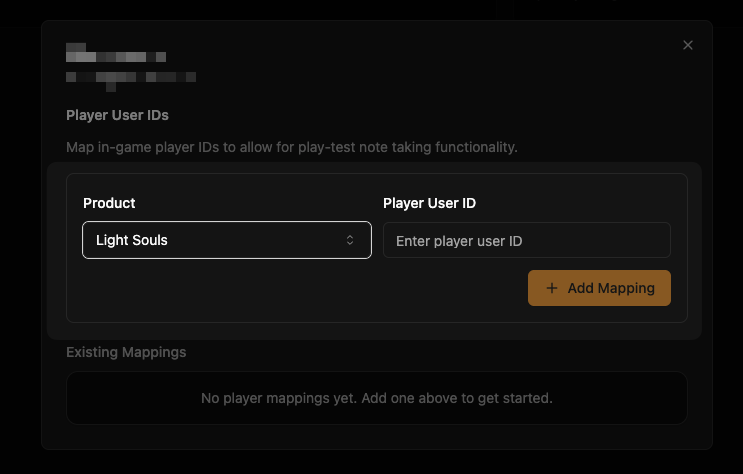
The SDK checks the current player's dev status when PlaySafeManager starts and whenever the app regains focus.
Forgiving a Player via the SDK
In addition to forgiving players from the PlaySafe dashboard, you can also forgive players programmatically using the ForgivePlayerAsync method.
This method is only available to dev players (how to mark a player as a dev). Non-dev players will receive a warning and the method will return null.
Function Signature:
public async Task<ForgivePlayerResponse> ForgivePlayerAsync(string playerUserId, bool shouldResetStrikes = false)
| Parameter | Type | Required | Description |
|---|---|---|---|
playerUserId | string | Yes | The unique ID of the player to forgive |
shouldResetStrikes | bool | No | Whether to reset the player's strike count (defaults to false) |
Usage Example:
var result = await PlaySafeManager.Instance.ForgivePlayerAsync(targetPlayerId, shouldResetStrikes: true);

if (result != null && result.Ok)
{
    Debug.Log($"Player {targetPlayerId} has been forgiven.");
}
Applying Manual Actions on Players
You can apply moderation actions on players programmatically using the SDK. This is useful for implementing custom moderation tools or admin panels within your game.
The typical workflow is:
- Call
GetProductActionsAsync()to retrieve the list of available actions - Display the available actions to the moderator
- Call
TakeManualActionOnPlayerAsync()with the chosen action to apply it to a player
These methods are only available to dev players. Non-dev players will receive a warning and the methods will return null.
Getting Available Product Actions
Before applying a manual action, you need to know which actions are available for your product. Use GetProductActionsAsync to retrieve the list.
Function Signature:
public async Task<ProductActionsResponse> GetProductActionsAsync()
This method takes no parameters.
Usage Example:
var actionsResponse = await PlaySafeManager.Instance.GetProductActionsAsync();

if (actionsResponse != null && actionsResponse.Ok && actionsResponse.Data != null)
{
    foreach (var action in actionsResponse.Data)
    {
        Debug.Log($"Action: {action.Name} (Value: {action.Value}, Permanent: {action.IsPermanent})");
    }
}
Each ProductActionData contains the following fields:
| Property | Type | Description |
|---|---|---|
Id | string | The unique ID of the product action |
Name | string | The display name of the action (e.g. "Temp Voice Ban") |
Description | string | A description of what the action does |
Value | string | The machine-readable action value (e.g. "temp_voice_ban") |
IsPermanent | bool | Whether the action is permanent |
Applying a Manual Action
Once you have the available actions, you can apply one to a player using TakeManualActionOnPlayerAsync.
Function Signature:
public async Task<ManualActionResponse> TakeManualActionOnPlayerAsync(
    string playerUserId,
    string productActionId,
    int durationInMinutes,
    string playerUsername,
    int numberOfStrikes = 1,
    string description = null)
| Parameter | Type | Required | Description |
|---|---|---|---|
playerUserId | string | Yes | The unique ID of the target player |
productActionId | string | Yes | The ID of the product action to apply - get this from GetProductActionsAsync() |
durationInMinutes | int | Yes | How long the action should last in minutes |
playerUsername | string | Yes | The target player's display name |
numberOfStrikes | int | No | Number of strikes to add (defaults to 1) |
description | string | No | A note explaining why the action was taken |
Usage Example:
// First, get available actions
var actionsResponse = await PlaySafeManager.Instance.GetProductActionsAsync();

if (actionsResponse != null && actionsResponse.Ok && actionsResponse.Data != null)
{
    // Pick an action (e.g. the first one, or let the moderator choose)
    var selectedAction = actionsResponse.Data[0];

    // Apply the action to a player
    var result = await PlaySafeManager.Instance.TakeManualActionOnPlayerAsync(
        playerUserId: targetPlayerId,
        productActionId: selectedAction.Id,
        durationInMinutes: 60,
        playerUsername: targetUsername,
        description: "Inappropriate behavior during match"
    );

    if (result != null && result.Ok)
    {
        Debug.Log($"Action applied. Action log ID: {result.Data?.Id}");
    }
}
Important Notes
-
Dev Only - The manual action, forgive, and get product actions methods are only available to dev players. Make sure the player calling these methods has dev status.
-
Get Actions First - Always use
GetProductActionsAsync()to get valid action IDs rather than hardcoding them, as they may change. -
Webhooks - Manual actions and forgiveness will trigger webhook notifications the same way as automated actions. Make sure your backend handles these appropriately.